


Be honest, are you here because you want to learn about how Kinesiology Tape can be used to help with bruising and swelling, or is it because you saw the main image and thought, 'woah, that looks cool, what does that funky application do?'.
If you're already familiar with Kinesiology Tape, then you'll already have a good idea of how it works and what sort of areas of the body its used for the most. But, what you might not know is that there are a lot of physios that use it to help with swelling and excessive bruising.
Does it actually work? Let's get into it.
USING TAPE TO REDUCE SWELLING:
WHAT IS KINESIOLOGY TAPE?
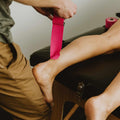
Just in case you don't already know, Kinesiology Tape is a stretchy, cotton (or synthetic) tape designed to mimic the elasticity of the skin. It’s used by athletes and therapists all over the world to provide pain relief and support to joints, muscles and even tendons.
It's rapidly become one of the most used products in sports medicine. It regularly graces the bodies of athletes of all levels as they push to compete injury-free. If you're a runner or know anybody that runs, you may already be familiar with it as it's regularly used to tape up knees and calves.
If you're interested in reading more about how Kinesiology Tape is used, why not check out our blog on how to get your roll to stick every time.
CAN KINESIOLOGY TAPE HELP REDUCE BRUISING AND SWELLING?
Can Kinesiology Tape actually help with bruising and swelling, or is it more of a placebo? Fair question...
Believe it or not—yes, it can! Research has shown that Kinesiology Tape can create areas of decreased pressure underneath the skin. This helps move excess fluid that's contributing to the swelling or bruising. Essentially, it supports the body’s natural recovery processes.
In short, it encourages blood circulation and lymphatic drainage, both of which promote faster healing. But for it to work properly, it’s important to apply the tape correctly and maximise the surface area it covers. It’s most effective when applied early, ideally within the first 24–48 hours after the injury, while swelling is still active.
People often report seeing a visible difference in swelling or bruising within a day or two, especially when paired with rest and elevation.
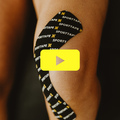
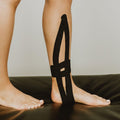
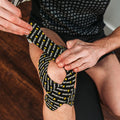
There are quite a few ways to apply Kinesiology Tape, and honestly, it often comes down to a bit of trial and error. One method we’ve found particularly effective—especially for dead legs—is the four-tail lymphatic fan. It sounds fancy, it looks fancy, but it’s actually really simple to do.

HOW TO TAPE FOR DEAD LEG:
STEP 1
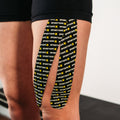
You're going to start by measuring a strip of Kinesiology Tape across 3/4 of your swollen or bruised area of the body. Purely for this example, we're using the quad as we're focusing on dead legs, but the principles all remain the same whether you're applying it to the arm or another bruised or swollen area.
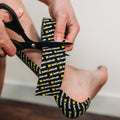
Cut your strip and from there, cut that strip into a 'four-tail lymphatic fan'. If you skipped this section of the blog, see the below image for a better idea of what this technique should look like. And exactly how it looks in the image, round the edges of each of your four tails.

STEP 2
Once you've got your first full strip of tape, all cut and rounded into our four tail technique, apply the anchor, (the full un-cut end of the tape) towards the top of your quad.
Or if you prefer the technical terms, at your nearest lymph node. For dead leg, this is the inguinal node at the top of the inner thigh. From there, lay each one of your strips in a wave pattern with around 15-20% stretch.

STEP 3
Now that you've applied your first wave, it's time for the second. Repeat the above steps from the opposite side of the thigh/quad, overlapping your first strip of tape. The goal here is to create an almost 'fanned' design directly over the area of swelling and you're going to want to cover the maximum surface area.
Once that's done and you're happy that it's covering as much of the affected area as possible, carefully rub the tape to activate the glue and wait at least 30-60 minutes before exercising in order to give it time to set.
DISCLAIMER
Before doing any of this, we have to remind you to please seek professional medical advice before applying Kinesiology Tape. Whether you’re a seasoned taping pro or a newbie, always get your knock fully assessed before applying anything. Better safe than sorry.

And that's it! It might look complicated, as well as super cool and funky, but if you follow the steps, it should be easy enough to get used to.
And like we mentioned earlier, it's another one of those applications that is very much trial-and-error. Experiment and find your own way to do it if need be. Stick to the main principles and cover as much of the swelling or bruising as possible and you should be flying!
If you want to see some other ways to tape for swelling, get in touch. Alternatively, if you're looking for any Kinesiology Tape applications or techniques, head to our learn page now!

